MedicalDirector cannot advise which report is best for your practice. This is best discussed with your accountant.
SUMMARY:
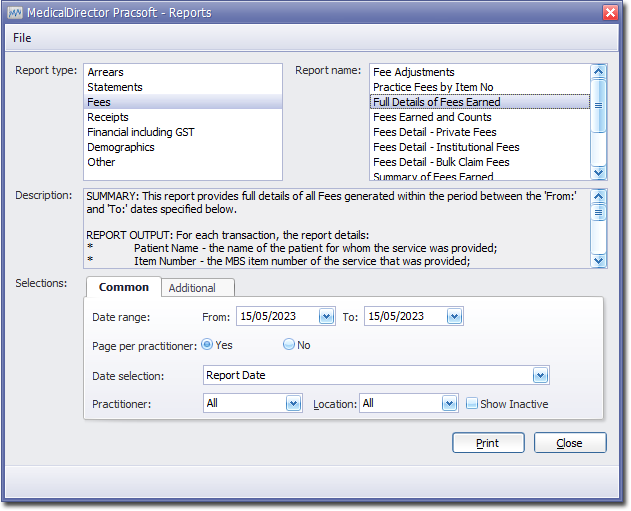
This report provides full details of all Fees generated within the period between the 'From:' and 'To:' dates specified below.
REPORT OUTPUT:
For each transaction, the report details:
Patient Name: The name of the patient for whom the service was provided;
Item Number: The MBS item number of the service that was provided;
Fee: The dollar amount that was charged for the service (GST exclusive); and
GST: The dollar amount of GST that was added to the Fee, where applicable.
Totals are provided for each practitioner, for each day and for the period as a whole.
By default, a separate page will be printed for each practitioner, but you may choose to print this as a summary for the whole Practice, by selecting 'No' where it says 'Page per Doctor'.
DATE SELECTION:
It is recommended that you use Report Date as the Date Selection, as this is a value that cannot be modified, ensuring integrity of the report. That is, if you print the report for a given date range today, and then print it again in twelve months' time, for the same date range, then the two versions of the report will be identical, no matter what reversals may be applied to the invoice in future reporting periods. In terms of this report, the term 'Report Date' refers to the date of entry of the invoice.
'Entry Date' and 'Report Date' only differ in relation to Bulk Billed or Vet Affairs visits and Held Accounts. The Entry Date of a voucher or held account is the date the individual voucher was entered into MedicalDirector Pracsoft, or the date the account was put on hold. In these cases, the Report Date refers to the date on which the voucher was batched in a claim, or the held account was printed on a tax invoice.
ADDITIONAL OPTIONS:
The Additional tab, below, includes a number of other options:
Include Adjustments - this option is checked by default, to include adjustment records in the report output. If you prefer to exclude adjustments, you can click the box to uncheck it.
Item No(s) - this option allows you to enter a specific item number to base the report on. If you enter an item number, then the report will only show you Fees for that item. If you wish to specify multiple item numbers, you must separate them with commas.
Institution - this option is disabled for this report.
To produce the report on multiple item numbers enter the numbers separated by a comma, for example 23,36,37/1.
It is recommended that you use Report Date as the Date Selection. The Report Date details the date the transaction is finalised.
To Reconcile the Report |
|
Columns on this Report |
Reconcile Against Report Columns |
Full Details of Fees Earned Report
|
Summary of Fees Earned Report
|
Full Details of Fees Earned Report
|
Practice Fees by Item No Report
|
Full Details of Fees Earned Report
|
Summary of Monthly Fees Report
|
Full Details of Fees Earned Report
|
Accounting Summary Report
|
To Generate a Full Details of Fees Earned Report
Select Reports > All Reports. The Pracsoft Reports window appears.
Within the Report Type section, select Fees.
Within
the Report Name section,
select Full Details of Fees Earned.

Select the Common tab:
Enter a Date Range for the report.
Indicate whether results for each practitioner will be printed on separate pages.
Via the Date Selection drop-down menu, indicate in which order you wish the results displayed.
Indicate which practitioner/s and location/s you wish to limit the report to.
Select the Additional tab:
If you wish to base the report on specific item numbers, enter them here, separating each with a comma.
Click Print when you are ready to proceed.