Correspondence > Actioned Items
You can view all documents and Investigations Results that have been actioned and moved to patient records, via the Clinical front screen by selecting Correspondence > Actioned Items.
Items can be managed from this window, as described in the following table. Alternatively, you can double-click an item to view it in more detail, where you can manage it individually.
Sort the list of Results by clicking on any column heading. The sort order of a column is indicated via the direction of the ![]() icon.
icon.
Double-click a result to view it in full-preview mode, where you can then also view any comments associated with the record.
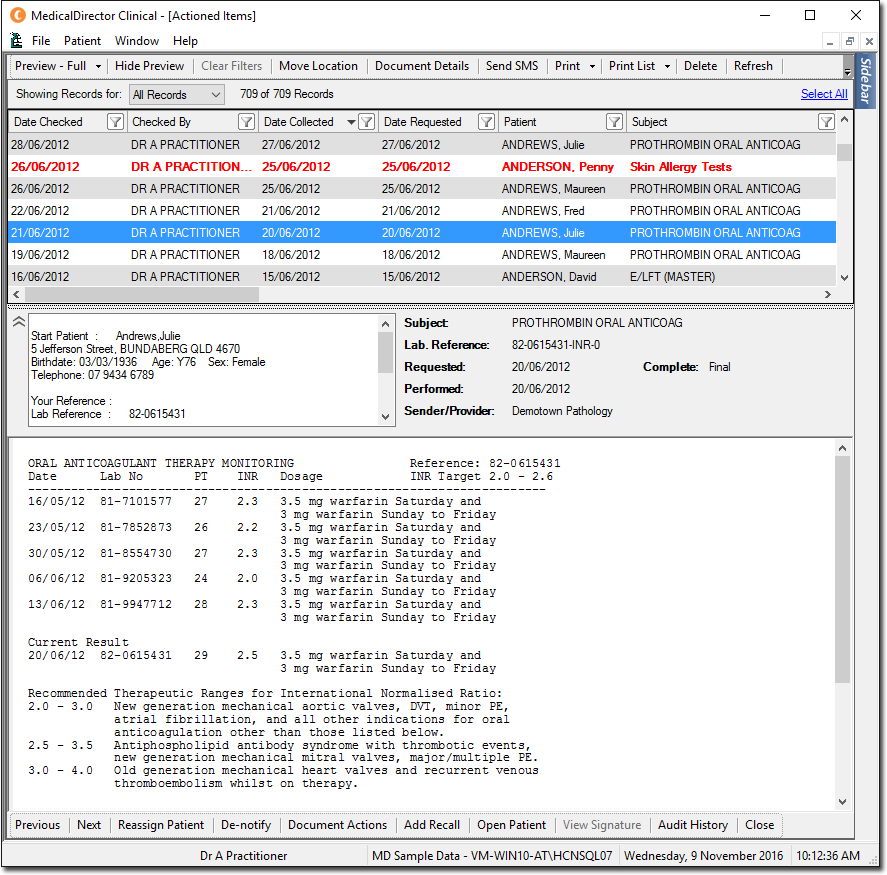
By default, when you first open the Actioned Items window, the list of items will be filtered to display only those that have been checked-off during the last three months (via the Date Created column).
Simple/Advanced filtering can be applied to this window. In the example above, the Date Checked column has been filtered;

See Filtering/Searching Correspondence Records for more information.
|
Items of interest on this window: Note that the range of option available to you will be limited by the level of access you have. |
|
|
Upper Section |
|
|
Preview; Full, Bottom, Right |
Controls the display of the preview pane, which contains selected document's details. Options are 'Full', 'Bottom', and 'Right'. The image above shows that 'Bottom' has been selected, and the details of the selected document are visible in the lower half of the window. |
|
Hide/Show Preview |
Hide or show the preview pane. |
|
Clear Filters |
Clears any filters you may have applied to this window. This option will be greyed-out if no filters have been applied. |
|
Move Location |
Click to move selected documents to a specific tab within the patient's record. You can select from the 'Documents', 'Letters' or 'Results' tabs in the Clinical Window, or the ECG tab of the Tool Box. |
|
Document Details |
Click to edit the details of a selected document. |
|
Send SMS |
Send an SMS message to the patient associated with the selected item. |
|
Print / Print To *Include Patient Header |
Prints every page of every multi-page document within every selected record;
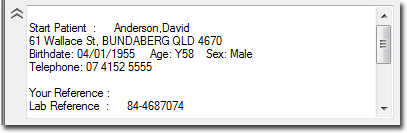
The 'Include Patient Header' option will print the patient's demographic data that appears at the top-left of an item, as shown in the example below. Most results include this information already, so it would normally be unnecessary for you to select this option. You can set whether this option is active or not by default via Investigations Options.
|
|
Print List / Print List To |
Prints a list of selected documents. Note that the details of the selected documents are not displayed on the printout.
|
|
Delete |
Click to delete selected documents. |
|
Refresh |
Click to refresh the list of documents. |
|
Holding File |
Click to open the Holding File. |
|
Zoom |
Select a zoom option fro the drop-down list provided. Only available to records that can be zoomed, such as photographs. |
|
Open Externally |
Opens the selected document in the default third-party application, for viewing externally to Clinical. Only available to records that must be opened by a third-party application. |
|
|
|
|
Lower Section |
|
|
Previous / Next |
Click to scroll through the list of documents. |
|
Assign / Reassign Patient |
Click to select a different patient to assign selected records to. |
|
Notify / De-notify |
Click to indicate that the patient was notified about the selected document. This may be used if you have scanned or imported an Investigation Result into the list of documents, for example. Conversely, for documents already flagged as 'notified', this button will read 'De-notify', and will flag the selected document accordingly. |
|
Add Recall |
Click to add a Recall for the patient. |
|
Open Patient |
Opens the record of the patient associated with the selected item. |
|
View Signature |
Click to view the digital signature of any encrypted document you have received via MD Exchange. |
|
Audit History |
Toggles half of the viewing area to display an audit trail of changes made to a selected document. |
|
Close |
Closes the Actioned Items window. |
Permissions Matrix
The following matrix indicates whether the Actioned Items window is available to the different user types in Clinical.
|
|
Doctor |
Nurse |
User |
User |
User |
User |
User |
User |
|
|
|
|
'Display results to staff' option disabled. |
'Display results to staff' option enabled. |
||||
|
Via the Clinical front screen |
|
|
|
|
|
|
|
|
|
Via the patient's record |
|
|
|
|
|
|
|
|

