F5 (all patients)
Select Correspondence > Check Holding File or Check Holding File (Current Patient)
The Holding File contains Investigations Results returned from your provider that have not yet been examined and saved to a patient's record, along with other correspondence scanned/imported here or from the Scan/Import Correspondence window (provided you have enabled the 'Show Scan/Import Correspondence in Holding File' option within Investigation Options). From within the Holding File you can also scan or import results and other documentation, assigning them to patients.
The Holding File is accessible to practitioners with top-level access only. Non-clinical staff, and practitioners without top-level access can still import/scan files via the Scan/Import Correspondence window. The Permissions Matrices at the end of this topic indicate which functionality is available to different user types. See also Document Management Scenarios.
Holding File for a Specific Patient
From within the patient's record, select Correspondence > Check Holding File (All Patients) and then follow the same steps you would for all patients, below.
Note that if this is a new patient record (has never received results) you will have to view and acknowledge at least 1 result for this patient from within the Holding File (For All Patients) first, for future results (from that laboratory to be auto-assigned to the patient. Likewise, if you receive results from a laboratory you haven't used for this patient before, you must assign at least one of these 'new' results to the patient before further results (from that laboratory) are automatically assigned to the patient.
Holding File for All Patients
Select Correspondence > Check Holding File (All Patients).
You
will be prompted to select one or more recipients whose results
you wish to examine.

From this window select the recipient(s) whose results you wish to examine:
Select a single recipient by clicking their name, and then clicking OK to open the Holding File to display only their results. Alternatively you can double-click a name to simultaneously select them and open the Holding File.
Select multiple recipients by clicking each name. To deselect a name, simply click it again. Then, click OK to open the Holding File to display only the results of the selected recipients.
Select
all recipients by clicking the All Recipients option. Clicking
OK then opens the Holding
File to display results for all recipients. Alternatively you
can double-click the All Recipients option to simultaneously select
all recipients and open the Holding File.
Note that, as making a selection from this window locks the results
associated with the selected recipient, it is recommended that
you select only a specific recipient, as selecting All
Recipients will prevent others from accessing any results
whilst you have the Holding File open.
When you receive an Investigation Result from a laboratory, the result should be associated with your user name as it appears in Clinical. However, this is not always the case - sometimes the laboratory may use an alias to refer to you in its system.
Consider the scenario where a user called Dr. A Practitioner receives results for multiple aliases that include 'Dr. A Practitioner', 'A. Practitioner', 'Dr. Anthony Practitioner', and 'Dr. Tony Practitioner', depending on which laboratory the results have come from. Determining which results are associated with which recipient record in Clinical can be confusing, particularly if your database contains multiple users who have the same or similar names.
To account for this, Clinical provides a facility for managing these user aliases. This tool allows you to;
Link one or more aliases with your user name in Clinical.
Automatically assign all results for these aliases with your user name when the Holding File is next opened.
Manage any alias-to-user links you have established.
You will then be presented with the Holding File.
(Optional)
Upon opening the Holding File, the first result in the list is
automatically selected and displayed. If Clinical cannot determine
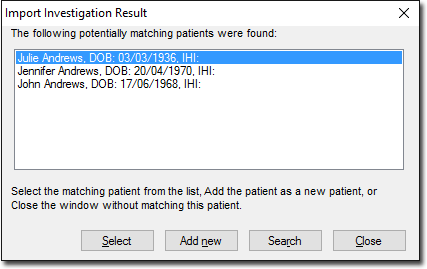
which patient the result relates to, you will be prompted to either
add a new patient to the database (by clicking  ), or select from a list of patients the result
could possibly belong to, as seen in the following example.
), or select from a list of patients the result
could possibly belong to, as seen in the following example.
You may also be presented with these prompts as you browse through
the list of results.
Rearrange the column order by clicking and dragging a selected column, and dropping it to a new location.
Sort
the list of Results by clicking on any column heading. The sort
order of a column is indicated via the direction of the ![]() icon.
icon.
Multiple records can be selected simultaneously using the CTRL or SHIFT keys, as per standard Windows functionality.
Simple/Advanced
filtering can be applied to this window. In the example above,
the Recipient/Doctor column has been filtered;
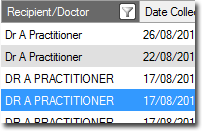
See Filtering/Searching
Correspondence Records for more information.
Within the Holding File you can check-off Results. See Checking Off New Results for information.
Review the table below for information on using the Holding File.
Items of interest on the Holding File window: Note that the range of options available to you will be limited by the level of access you have. See the Permissions Matrices below for more information. See also Keyboard Shortcuts. |
|
Upper Section |
|
Clear Filters |
Click the Clear Filters button to clear all filters. When this button appears greyed-out, it indicates that no filters have been applied. |
Comment |
Details of any comments recorded. |
Date Collected |
The date on which the sample was taken from the patient. |
Date Created |
The date on which the result was created by the laboratory. See also 'Date Requested'. |
Date Notified |
The date on which the notification for this test was made. |
Delete |
Click to delete selected entries. |
Document Details |
Click to edit the details of a selected Result. Use the button also to view large document descriptions. |
Edit > Copy Result |
Copy a selected item's content to the clipboard. |
File > Add Cervical Screening |
Allows you to manually add Cervical Screening results for a selected patient (female or gender-neutral, >15 years of age). |
File > Mark for Recall |
Create a Recall notification for the patient. Variable "Recall_Management" is not defined |
File > Outstanding Requests |
Opens the Outstanding Requests window. |
Hide/Show Preview |
Hides/Reveals the preview pane. |
Import |
Click to import a document directly into the Holding File, after which you can assign the document to a patient, via the Document Details button (see above). |
Move Location |
Click to move selected Results to a specific tab within the patient's record. You can select from the Documents, Letters or Results tabs in the Clinical Window, or the ECG tab of the Tool Box. |
Notation |
Details of any notation that has been made. |
Open Externally |
Opens the selected document in the default third-party application, for viewing externally to Clinical. Only available to records that must be opened by a third-party application. |
Patient |
The name of the patient associated with the select result. |
Patient > Open |
Calls the 'Select Patient from List' window, allowing you to open any patient's record. |
Patient > Open Patient |
Opens the record of the selected patient. |
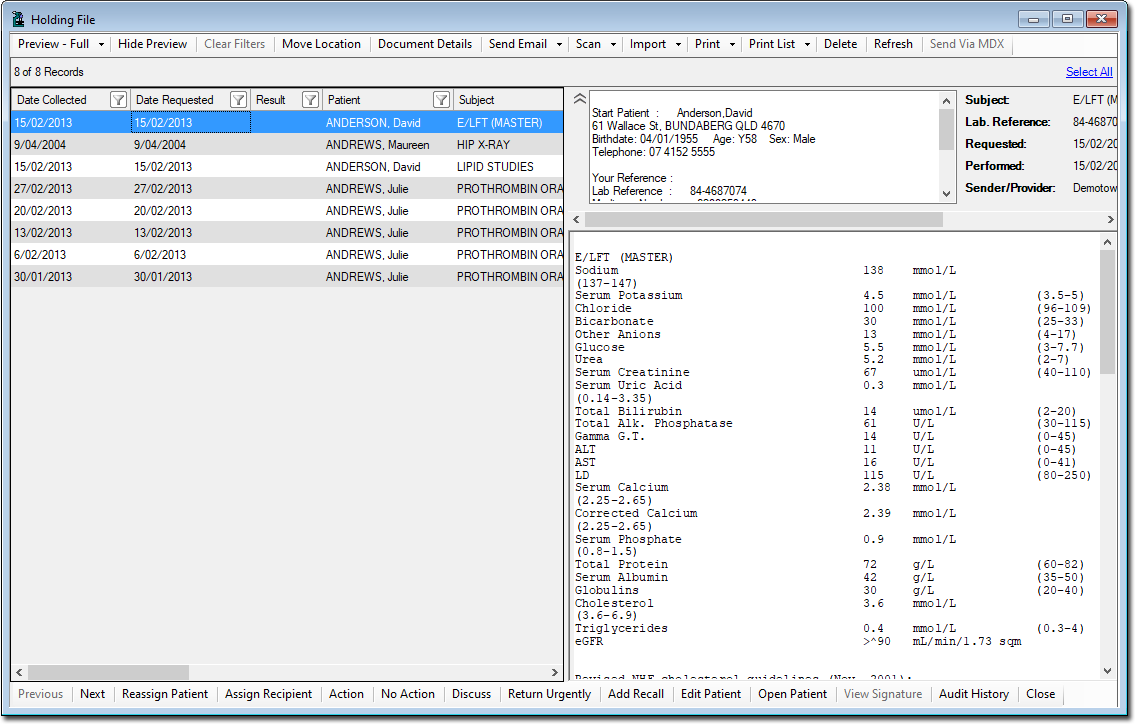
Preview |
Controls the display of a selected document's details. Options are 'Full', 'Bottom', and 'Right'. The image above shows that 'Bottom' has been selected, and the details of the selected document are visible in the lower half (bottom) of the window. |
Print / Print To *Include Patient Header |
Prints every page of every multi-page document within every selected record;
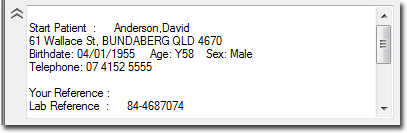
The 'Include Patient Header' option will print the patient's demographic data that appears at the top-left of an item, as shown in the example below. Most results include this information already, so it would normally be unnecessary for you to select this option. You can set whether this option is active or not by default via Investigations Options.
|
Print List / Print List To |
Prints a list of selected documents. Note that the details of the selected documents are not displayed on the printout.
|
Recipient/Doctor |
The name of the recipient of the test. |
Refresh |
Refreshes the window. |
Result |
E.g. 'Normal', 'Abnormal'... |
Scan |
Click to scan a document directly into the Holding File, after which you can assign the document to a patient, via the Document Details button (see above). |
Sender/Provider |
The name of the laboratory that conducted the test. |
Source |
E.g. SDI, imported, scanned. |
Subject |
The name of the test ordered. |
Type |
Indicates the type of test (e.g. Pathology, Cytology etc) |
User Name |
The name of the user who imported the file. For SDI results, the name of the computer on which the file was imported. |
Zoom |
Select a zoom option fro the drop-down list provided. Only available to records that can be zoomed, such as photographs. |
|
|
Lower Section |
|
Action |
Calls the Action window, which allows you to indicate which sort of action you would like to take regarding this Result. Such actions include 'Discuss', 'Return Urgently' and so forth. You can also create customised Actions, which will be saved for later use. For more information about Actions, see Adding Results Manually. Use this button also to view large comments. |
Add Recall |
Click to create a Recall notification for the patient. |
Assign/Reassign Patient |
Assigns the selected result to the patient. If no matching patient record can be found, you will be prompted to either add a new patient or search for an existing patient to match the result to. |
Assign/Reassign Recipient |
Click to assign the selected Result to a specific recipient. If the Result is already associated with a recipient, clicking this button allows you to assign it to another. |
Audit History |
Toggles half of the viewing area to display an audit trail of changes made to a selected Result. The following events are tracked:
|
Close |
When viewing the Holding File, clicking this button closes the Holding File. When viewing an individual record in 'full view', clicking this button closes the record and returns you to the Holding File. |
Discuss |
Click to indicate that you wish to discuss the result with the patient. |
Edit Patient |
If the demographic details on the Result are incorrect, i.e. they do not exactly match an existing patient in the database, you can edit the demographics in the result by clicking this button. Modify the details as required, ensuring that the information is correct for the intended patient. After editing, MedicalDirector Clinical will try to rematch with a patient in the database. |
No Action |
Click to indicate that no actions are required regarding the selected Result. |
Return Urgently |
Mark the selected item as 'Return Urgently'. |
Open Patient |
Click to open the clinical record of the patient associated with the selected record.. |
Previous/Next |
Click to scroll through the list of records, displaying the details of each, one-by-one. |
View Signature |
Click to view details about the digital signature used for a selected e-mail in the Holding File, imported via MDExchange. |