When Clinical scans documents, it calls the software that was supplied with your scanner, and uses this software to perform the scan. Therefore, you must have third-party scanning software installed on the computer you wish to perform the scan on.
Scanning Documents Externally to Clinical
All third-party scanners provide the functionality to scan and save the file to the computer. It is advised that you create a central folder to store these scanned items, which can be set within your scanner software settings. Consult your Systems Administrator about how to set the scanner settings, and how to scan within your scanning software.
Recommended file storage locations include:
Desktop
My Documents
Shared Documents (to cater for multiple users scanning)
Recommended file formats:
Scanning Documents Within Clinical
There are a number of places from which information can be scanned into Clinical;
Via the Correspondence tab, Results tab, Letters tab and Documents tab within the patient's Clinical Window.
Via the Holding File.
Via the Scan/Import Correspondence window.
The scanning utility is available to different user types, based on the following rules;
Scan via the... |
Doctor |
Nurse |
User |
User |
User |
|
|
|
|
|
|
|
|
|
|
|
|
|
|
|
|
|
|
|
|
|
|
|


See also Document Management Scenarios.
To Perform a Scan
The following steps describe the scanning process as shown via the Scan/Import Correspondence window. This process is the same, regardless of how you access it in Clinical.
Select
the Correspondence
tab within a patient's record.

Click
 in
the upper tool bar. The Scan
Document window appears.
in
the upper tool bar. The Scan
Document window appears.
![]()
A single document can consist of a combination of
multiple scanned or imported pages. The Scan Document
window displays a list of all the pages you have either scanned
or imported into the current document. When you first
initiate a new scan/import session (to add a new document to the
patient's record), this window will initially contain no pages,
as shown above.
Click
![]() This
calls your third-party scanning software, with which you conduct
the scan. Please consult its Help documentation if you require
assistance.
This
calls your third-party scanning software, with which you conduct
the scan. Please consult its Help documentation if you require
assistance.
Upon completing the scan, you will be returned to the Scan Document
window. You will be able to see a preview of the scan you have
conducted, along with all the other scans you have added to this
document. Each thumbnail on the left-hand side of this window
represents a page that you have either scanned or imported into
this document. The example below shows that the current document
consists of two scanned pages.

From here you can:
Delete pages from the document by right-clicking a thumbnail, and selecting Delete Thumbnail.
Re-arrange pages within the document by selecting a thumbnail with your mouse, and dragging it above or below others in the list.
Add annotations to a selected page. Annotation tools are available from the associated drop-down menu and button set. See the table below for information.
Items of interest on this window |
|
|
Allows you to import pages into the current document .See Importing Documents for more information. |
|
Calls the Scan Document window, allowing you to conduct a scan. You can continue to click on this button to add pages to your scanned document. See Multi-page Documents and Records for more information. |
|
Saves the current document (including all pages scanned/ imported) to the patient record, and closes the Scan Document window. |
|
Zoom In to / Out from the selected page in the current document. This changes the zoom of the page, but not the thumbnail. |
|
Automatically re-sizes the selected page to fit the width of the viewing pane within the Scan Document window. |
|
Rotate the selected scan anti-clockwise/clockwise by 90 degrees. |
|
Select the Pan tool and then click and hold a selected page to drag it around the viewing pane within the Scan Document window. This tool is only effective if you have zoomed into the page; if 100% of the page is visible, this tool has no function. |
|
Use this tool to select an annotation you have made to the selected page. Annotations can be moved and manipulated with this tool. |
|
User this tool to draw an ellipse upon the selected page. Once you have drawn an ellipse, you can use the Cursor tool (see above) to resize/reposition it. If you right-click an ellipse, you can edit its border and fill colours. |
|
Use this tool to highlight areas within the selected page. Once you have drawn a highlight, you can use the Cursor tool (see above) to reposition it. |
|
Use this tool to draw a straight line upon the selected page. Once you have drawn a line, you can use the Cursor tool (see above) to resize/reposition it. If you right-click a line, you can edit its border (colour). |
|
Use this tool to draw a freehand line upon the selected page. Once you have drawn a line, you can use the Cursor tool (see above) to resize/reposition it. If you right-click a line, you can edit its border (colour). |
|
Use this tool to create a text box upon the selected page, by clicking and dragging upon in the selected page in a diagonal motion. The outline of the text box will appear. Release the mouse when the text box has reached the size you desire.
Once you have created a text box, click within it and begin typing to add text.
Once you have drawn a text box, you can use the Cursor tool (see above) to resize/reposition it. If you right-click a text box, you can edit its border and fill colours, and edit the font/font colour. |
|
Undo/Redo Annotations you have added to a selected page. |
Cleanup Menu |
De-skew: attempts to de-skew the selected page. De-speckle: attempts to automatically remove dots and speckles from the selected page. Remove Borders: attempts to automatically detect and remove obvious borders around a selected page. Such borders can result from a photocopied document. Remove Hole Punch: attempts to automatically detect and remove the marks left from a photocopied document that contained hole punches. |


Click
 to
close the Scan Document window. You will be returned to the patient's
record.
to
close the Scan Document window. You will be returned to the patient's
record.
The Document Details window appears. Enter details as desired. The Subject and Document Type is required information.
Date Entered: This is the date collected, for audit trail purposes, and cannot be edited.
Document Date: Change to the most relevant date according to the document.
Subject: Detects the name of the document, which may be the temporary file name assigned by the scanner.
Description: A brief description of the document. This will be seen on the correspondence tabs.
Document Location: The document will be stored in this location in the patient’s record.
Document Type: This indicates the type of document.
Assign to Doctor: This is the doctor that is required to action the correspondence, or the Doctor that has already checked the correspondence prior to scanning. If a doctor is not assigned to a document, this will only be visible when selecting ‘All Practitioners’ within the Holding File.
Select Patient: All imports outside of the patient’s record will need to be assigned to a patient. All scans within a patient’s record are automatically assigned to the patient.
Delete source
file after import:
Ticking this box will delete the scanned file after import.
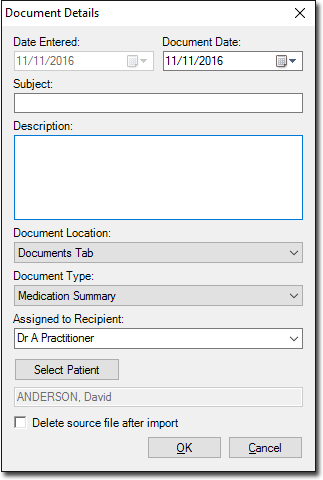
Click OK to save the document information and close the Document Details window. The new document will now appear within the patient's record.