F3 (via the Results Tab)
To add Investigation Results manually, from within the patient's Clinical Window, you can either:
Select the Results tab, and then press F3 on your keyboard
Select
the Results tab, and then click 
Select the Results tab, and then click Add
Select the Correspondence tab, and click Add
The Add Investigation Result
window appears.
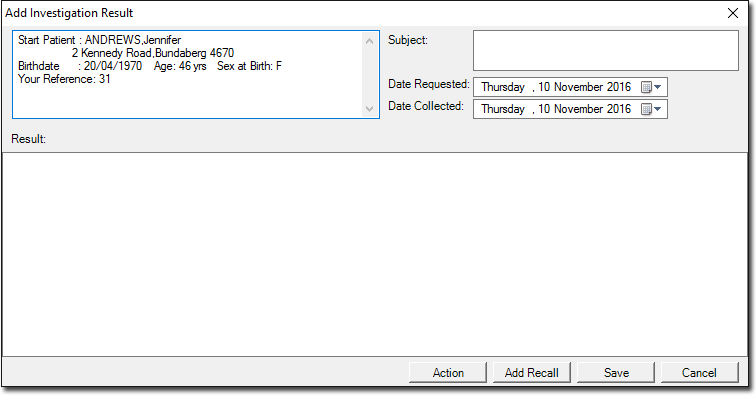
Enter a description in the Subject field. This summary will appear within the patient's record, and helps to identify this Result. This field accepts a maximum of 40 characters.
Indicate both the Date Requested and Date Collected.
Enter the Result's data in the Result section. The Result may be typed into Clinical or text can be copied from another program using the Windows clipboard
Click  The Action
window appears.
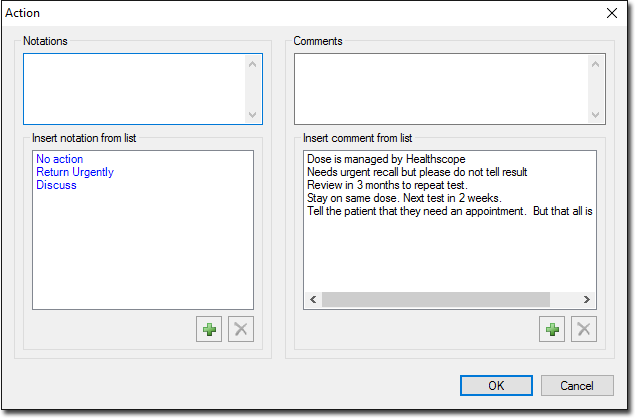
The Action
window appears.
Add a notation / comment as desired, by selecting them from the available lists.
You can add new notations and comments by typing into the text boxes provided.
If
you want to add the notation/comment to the lists presented (so
that they're available for use next time), ensure you click the
 button. If you only
click
button. If you only
click  , the Action will be recorded against
the patient's record successfully, but it will not be added to
these lists. See A
Note About the Actions List for important information about
the Actions list.
, the Action will be recorded against
the patient's record successfully, but it will not be added to
these lists. See A
Note About the Actions List for important information about
the Actions list.
You
can delete customised notations and comments by selecting them
and clicking 
You
can edit an Action later, by selecting the Result and clicking

Click OK to continue. You will be returned to the Add Investigation Result window.
(Optional) If you wish to create a Recall for this Investigation Result, click Add Recall now.
Click Save to save the Result and return to the patient's record.
A Note About the Actions List
The Action window allows you to record Notations and Comments against a patient's Investigations Result.
There are two ways to add a notation/comment:
Select a notation/comment from the lists provided, and click OK
Record a new notation/comment in the text boxes provided. If you choose this method, you then have another decision to make: whether to also add the new notation/comment to the list of saved options.
To
record the notation/comment against the patient's record
and also add it to available lists, click the
associated
button, and then click OK
To
record the notation/comment against the patient's record
without also adding it to available lists,
simply click There's
an important caveat about this option you need to be aware of:
notations/comments recorded in this way cannot
be removed from the filter list in the Actioned Items window.
See below
for more information.
A Caveat About the Notations/Comments Filter
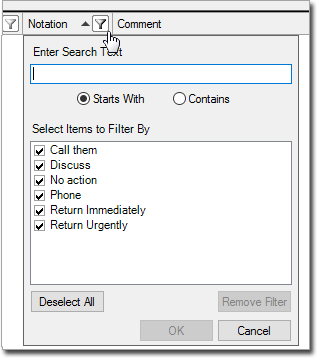
After you've actioned a result, it is added to the list of Actioned Items, and this list can be filtered by any notation or comment you made.
In the example below, we are about to filter the Actioned Items list by 'notation'.
The
list of 'items to filter by' contains every notation, regardless
of whether it was simultaneously added to the source list of notations
( button), or simply
recorded ad-hoc.
You can see that there are two similar notation entries; "Return Urgently" and "Return Immediately". It is recommended that you don't create multiple similar items like this, when recording an action (as explained above), as it can create more work for you when conducting a search for results. Rather, it is recommended that you encourage users to look through the lists of notations/comments when they're actioning a result, and select one from the list, creating new entries only when there is nothing suitable to select from. You can remove duplicate (similar) entries from this list, but it's not a simple process - See 'Managing the Notation and Comment Filters' for information.