The Correspondence tab of the Clinical Window displays a list of all patient documents, as found on the Documents tab, Results tab, and Letters tab. You can scan or import new documents via the Correspondence tab, and store them on either of the other tabs mentioned. Note that the Correspondence tab is not available to users with basic access. Such users can scan/import via the Scan/Import Correspondence window. The Correspondence tab can be disabled via Clinical tab of Clinical Options.
See also Document Management Scenarios.

By default, items are displayed in order of date collected.
Rearrange the column order by clicking and dragging a selected column, and dropping it to a new location.
Sort
the list of Results by clicking on any column heading. The sort
order of a column is indicated via the direction of the ![]() icon.
icon.
Double-clicking a record opens the record in a separate window. Previous/Next buttons on this latter window allow you to browse through the list of records.
Multiple records can be selected simultaneously using the CTRL or SHIFT keys, as per standard Windows functionality, or by clicking the Select All link.
Simple/Advanced
filtering can be applied to this window. In the example above,
the Recipient/Doctor column has been filtered;
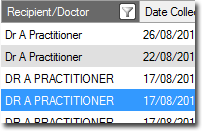
See Filtering/Searching
Correspondence Records for more information.
Details of a selected record are displayed in the lower section of this window. Alternatively you can double-click a record to view it in an expanded view.
If you sort the records on this window, including the repositioning of any columns, this sort order is retained upon closing the patient's record.
Items of interest on this window: Note that the range of option available to you will be limited by the level of access you have. |
|
Upper Section |
|
Add |
Allows you to add a new Letter or Investigations Result. |
Checked By |
The name of the user who checked the result in the Holding File. |
Clear Filters |
Clears any filters you may have applied to this window. This option will be greyed-out if no filters have been applied. |
Clear Search |
Undo any keyword search you have performed. |
Comment |
Details of any comments recorded. |
Complete |
Indicates the final in a series of results. |
Date Checked |
The date on which the result was checked in the Holding File. |
Date Collected |
The date on which the sample was taken from the patient. |
Date Created |
The date on which the result was created by the laboratory. See also 'Date Requested'. |
Date Notified |
The date on which the notification for this test was made. |
Date Requested |
The date the practitioner requested the test be performed. See also 'Date Created'. |
Delete |
Click to delete selected documents. |
Description |
Detailed information about the result. |
Document Details |
Click to edit the details of a selected document. |
Hide/Show Preview |
Hide or show the preview pane. |
Import |
Click to import a file directly into the Documents tab. |
Location |
Indicates the source tab of the item e.g. 'Documents', 'Letters' or 'Results' tab. |
Move Location |
Click to move selected documents to a specific tab within the patient's record. You can select from the 'Documents', 'Letters' or 'Results' tabs in the Clinical Window, or the ECG tab of the Tool Box. |
Notation |
Details of any notation that has been made. |
Notified By |
The name of the user who recorded the notification. |
Open Externally |
Opens the selected document in the default third-party application, for viewing externally to Clinical. Only available to records that must be opened by a third-party application. |
MyHealthRecord Activity Date |
The date on which My Health Record activity was performed. |
MyHealthRecord Status |
The current status of any My Health Record activity performed on the correspondence item. |
Preview; |
Controls the display of the preview pane, which contains selected document's details. Options are 'Full', 'Bottom', and 'Right'. The image above shows that 'Bottom' has been selected, and the details of the selected document are visible in the lower half of the window. |
Print / Print To *Include Patient Header |
Prints every page of every multi-page document within every selected record;
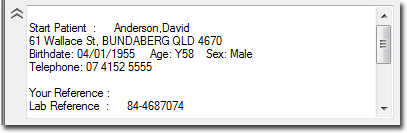
The 'Include Patient Header' option will print the patient's demographic data that appears at the top-left of an item, as shown in the example below. Most results include this information already, so it would normally be unnecessary for you to select this option. You can set whether this option is active or not by default via Investigations Options.
|
Print List / Print List To |
Prints a list of selected documents. Note that the details of the selected documents are not displayed on the printout.
|
Recipient/Doctor |
The name of the recipient of the test. |
Refresh |
Click to refresh the list of documents. |
Remove from MyHealthRecord |
Click to remove the selected document to the My Health Record system. You can also right-click a selected document to access this command. |
Scan |
Click to scan a document directly into the Documents tab. |
Search |
Perform a keyword search of the list of records. |
Sender/Provider |
The name of the laboratory that conducted the test. |
Send SMS |
Send an SMS message to the patient associated with the selected record. |
Send to MyHealthRecord |
Click to send the selected document to the My Health Record system. You can also right-click a selected document to access this command. |
Source |
E.g. SDI, imported, scanned. |
Subject |
The name of the test ordered. |
Type |
Indicates the type of test (e.g. Pathology, Cytology etc) |
User Name |
The name of the user who imported the file. For SDI results, the name of the computer on which the file was imported. |
Zoom |
Select a zoom option fro the drop-down list provided. Only available to records that can be zoomed, such as photographs. |
|
|
Lower Section |
|
Action |
Record/Edit an Action against a selected record. |
Add Recall |
Click to add a Recall for the patient. Variable "Recall_Management" is not defined |
Assign / Reassign Patient |
Assigns the selected result to the patient. If no matching patient record can be found, you will be prompted to either add a new patient or search for an existing patient to match the result to. |
Assign / Reassign Recipient |
Click to associate the selected item with a specific recipient. |
Audit History |
Toggles half of the viewing area to display an audit trail of changes made to a selected document. |
Cumulative Results |
Click to view cumulative results (if available) of any selected result. |
Notify / De-notify |
Click to indicate that the patient was notified about the selected document. This may be used if you have scanned or imported an Investigation Result into the list of documents, for example. |
Previous / Next |
Click to scroll through the list of documents. |
View Signature |
Click to view the digital signature of any encrypted document you have received via MD Exchange. |