MDExchange messaging functionality is available to registered subscribers of the service i.e. practitioners who have a valid Licence to use the service, and have successfully completed the MDExchange Registration Wizard. The registration process requires you have an active Internet connection.
From the Clinical front screen, select Tools > MDExchange > Registration Wizard. The MDExchange Wizard Welcome screen appears.

The MDExchange Wizard also appears automatically upon running Clinical.
Click Next to continue. The MDExchange Licence Agreement appears.
Read the Licence agreement. If you agree to the Licence, tick the I have read and accepted the agreement check box, and then click the I Agree button to continue. You will not be able to register until you have performed these actions.
The MDExchange Server Connection Setup window appears.

Click Next A test for connectivity is now performed, as indicated in the upper-right of the window. Only when a connection has been established successfully will you be able to proceed with the MDExchange Registration Wizard.
You can edit the MDExchange Server Connections settings after MDExchange has been installed, via the Clinical Front Screen > Tools > MDExchange > Proxy Server Setup.
If your Server computer is behind a Proxy Server that requires authentication (i.e. it is not possible to connect to MDExchange without providing a username, and password) and you haven't updated your Server with the latest Microsoft Windows updates, the proxy server authentication will fail.
The MDExchange Registration Wizard will notify you of this by providing a View Connection Error link, which will appear on the window above, and lead you to the Registration Wizard Log. If within this log file you see the text The remote server returned an error: (407) Proxy Authentication Required you can resolve this by updating Windows via the Windows Update utility, available via Start > All Programs > Windows Update.
This issue and related solution has been verified on Windows 2000 SP4 and Windows XP Pro SP2.
MedicalDirector recommends that you consult your Systems Administrator for assistance with this scenario.
The Contact Details window appears.

The practice details will automatically be populated with those recorded in the Practice tab of MedicalDirector Clinical Options. Confirm that they are correct, and make changes as necessary. Note that changes made here are saved back to the Practice tab of Clinical options.
MDExchange uses certificates that have a from date and to date. If the time on your practice Server computer is incorrect, certificates downloaded from the online MDExchange Servers may not be valid. This could prevent your practice from registering with MDExchange, and perhaps prevent you from sending or receiving messages.
Click Next when you are ready to continue.
The Security Options - Location window appears.

Here you need to determine which type of Certificates you will use for the digital signing and encrypting of correspondence you send and receive via MDExchange. Select the certificate type using the appropriate option. The default and recommended certificates are MDExchange Certificates. Alternatively you can select HESA Certificates. Note that you cannot select HeSA tokens (i-Keys) for Practice encryption or signing because that would require the token to be constantly available (plugged in) to the server computer.
You can edit the security options after MDExchange has been installed, via the Clinical Front Screen > Tools > MDExchange > Security.
Once you have selected which certificates to use, click Next to confirm your selection and continue.
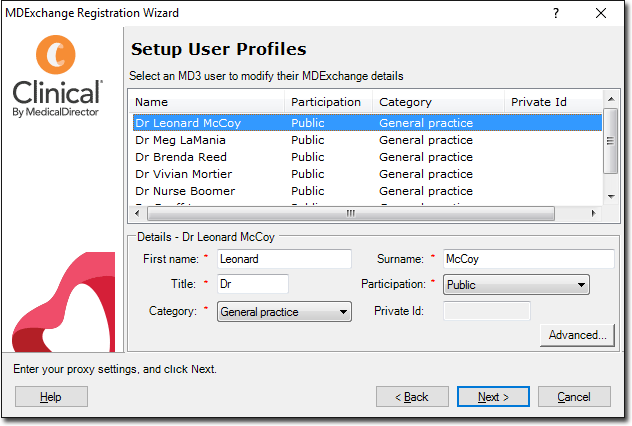
The Setup User Profiles window appears.

Only practitioners in your Clinical User Database are able to register for MDExchange. Here you have an opportunity to indicate which practitioners will not have access. For those that do have access you can also specify how they will be listed in the MDExchange Public Database, and what signing certificate they will use for correspondence (via the Advanced button).
The Participation drop-down menu indicates Public participation by default. To prevent this user from participating in MDExchange, select the Do Not Participate option. Should you wish this user to participate in MDExchange, you must select whether the user should be publicly or privately listed.
Click the Advanced button to specify if you select a HESA token as the signing certificate for a user, rather than the default, which is to use the practice's signing certificate
You can edit user details after MDExchange has been installed, via the MedicalDirector Clinical Front Screen > Tools > MDExchange > Setup User Profiles.
Make changes as necessary for each user, and click Next on the Setup User Profiles window when you are ready to continue.
The Ready to Register window appears. Click Back if you need to go back through MDExchange Registration Wizard to review your settings.
When you are ready to register MDExchange, click  .
.
The MDExchange Registration Wizard attempts to connect to the MDExchange server to validate and record your settings. You must have an active Internet connection for this process to succeed.

You will be notified upon successful registration.

With MDExchange enabled, you can now take advantage of ePrescribing.