File > Scan/Import Correspondence
The Scan/Import Correspondence window provides users with a means to scan or import results and other documentation, which can be stored automatically to the Holding File, or manually stored to the patient's record or the Holding File.
Whilst all users can access the Scan/Import Correspondence window, it is provided primarily for non-clinical staff, or practitioners without top-level security access. Practitioners with top-level security can access the Holding File as well, which provides them with extra functionality.
To access the Scan/Import Correspondence window, select File > Scan/Import Correspondence.
Sort the list of Results by clicking on any column heading. The sort order of a column is indicated via the direction of the ![]() icon.
icon.
Multiple records can be selected simultaneously using the CTRL or SHIFT keys, as per standard Windows functionality, or by clicking the Select All link.
To filter records, see Filtering/Searching Correspondence Records.
|
Items of interest on this window |
|
|
Upper Section |
|
|
Patient > Open |
Calls the 'Select Patient from List' window, allowing you to open any patient's record. Alternatively, press F2. |
|
Patient > Open Patient |
Opens the record of the selected patient. |
|
Preview; |
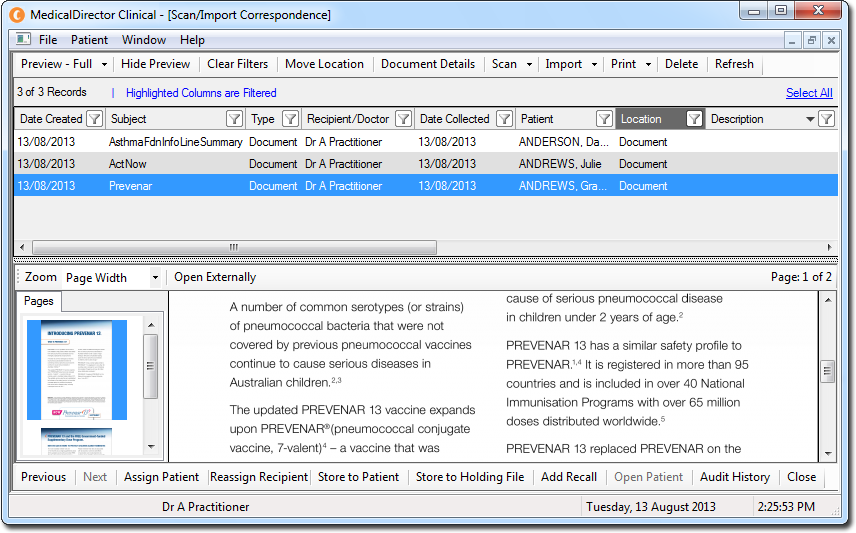
Controls the display of the preview pane, which contains selected document's details. Options are 'Full', 'Bottom', and 'Right'. The image above shows that 'Bottom' has been selected, and the details of the selected document are visible in the lower half of the window. |
|
Hide/Show Preview |
Hide or show the preview pane. |
|
Clear Filters |
Click the Clear Filters button to clear all filters. When this button appears greyed-out, it indicates that no filters have been applied. |
|
Move Location |
Click to move selected Results to a specific tab within the patient's record. You can select from the 'Documents', 'Letters' or 'Results' tabs in the Clinical Window, or the ECG tab of the Tool Box. |
|
Document Details |
Click to edit the details of a selected Result. |
|
Scan |
Click to scan a document, after which you can assign the document to a patient, via the Document Details button (see above). |
|
Import |
Click to import a document, after which you can assign the document to a patient, via the Document Details (see above). |
|
Print / Print To *Include Patient Header |
Prints every page of every multi-page document within every selected record;
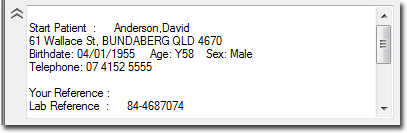
The 'Include Patient Header' option will print the patient's demographic data that appears at the top-left of an item, as shown in the example below. Most results include this information already, so it would normally be unnecessary for you to select this option. You can set whether this option is active or not by default via Investigations Options.
|
|
Delete |
Click to delete selected entries. |
|
Refresh |
Refreshes the window. |
|
|
|
|
Lower Section |
|
|
Zoom |
Change the zoom level of the selected document in the preview window. |
|
Open Externally |
Opens the selected document in Windows' default application. For example, a PDF will open in Adobe Reader. |
|
Previous/Next |
Click to scroll through the list of documents, displaying the details of each, one-by-one. |
|
Assign/Reassign Patient |
Assigns the selected document to the patient. If no matching patient record can be found, you will be prompted to either add a new patient or search for an existing patient to match the document to. |
|
Assign/Reassign Recipient |
Click to assign the selected document with a specific recipient. If the document is already associated with a recipient, clicking this button allows you to assign it to another. |
|
Store to Patient |
Similar to the 'Assign Patient' functionality, clicking this button immediately stores the selected record to the patient's record, and transfers any actioned items to the Actioned Items list. |
|
Store to Holding File |
Immediately transfers the selected record to the Holding File. Note that all imported/scanned documents will automatically be available to the Holding File if you have enabled the 'Show Scan/Import Correspondence in Holding File' option in Investigations Options. |
|
Add Recall |
Allows you to generate a Recall notification for the patient. Variable "Recall_Management" is not defined |
|
Open Patient |
Allows you to open a patient's record directly from the Scan/Import Correspondence window. Note that if you currently have a document record selected, and it has already been assigned to a patient, clicking this button immediately opens the record of the associated patient. |
|
Audit History |
Toggles half of the viewing area to display an audit trail of changes made to a selected document . The following events are tracked:
|
|
Close |
Closes the Scan/Import Correspondence window. |