Ctrl + D
View > Data Toolbar(Letter Writer)
About Fields
'Fields' are used to automatically populate letters with data or other information that would normally be time-consuming for you to enter manually.
Consider a Field as a 'container', that when added to a letter or template, becomes filled with information. This information can come from a Clinical database (like your patient's data), or can consist of ancillary information like today's date, for example. The actual behind-the-scenes construction of a field (known as a field code) allows Letter Writer to differentiate between a field and 'regular' text, as explained following.
The following is an example of a field code, and in this instance is the Field Code used to display a patient's Full Name; it's a set of instructions Letter Writer interprets as "Display the patient's full name here".
<<Patient Demographics:Full Name>>
When this field is used in a letter, it is automatically replaced by the patient's full name; you see only the patient's actual full name - the field code used to generate it is hidden.
When this field is added to a template however, you will see the actual field code (as in the example above) until a new letter (based on the template) is created, at which time the field becomes populated with the patient's Full Name. The advantage of adding fields to templates, is that the template can be saved and then used later for other patients by other practitioners, and when a letter based on such a template is created it will always be populated with data that relates to the patient whose record is currently open.
To see fields in action, create a new letter based on one of the supplied Clinical templates. As the letter is generated, you may notice the fields quickly appear on the letter before they become populated with data. See Using Templates for more information.
Do not attempt to type these codes manually, as Letter Writer will not recognise them, and assume they are 'regular' text. Fields must be added to a letter via the Data Toolbar, as explained following.
Furthermore, if a field code is altered whilst on the page, you must replace it rather than attempt to 'repair' it using your keyboard.
About the Data Toolbar
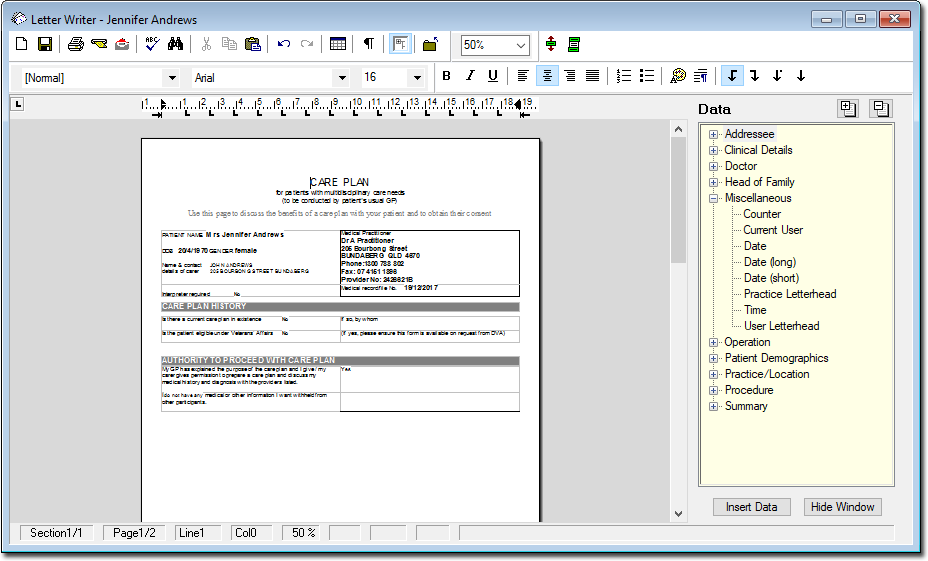
The Data Toolbar is the Field repository from which you select fields to add to your letters and templates. It appears on the right-hand side of the Letter Writer window, as seen in the following image.

Accessing the Data Toolbar
Clicking

Pressing Ctrl + D
Selecting View > Data Toolbar
The Data Toolbar and associated available fields vary slightly, depending on whether you are within a letter or a template, and depending on whether you are using the Letter Writer from within a patient's record or via the Clinical front screen;
When adding fields to a letter the Data Toolbar's title is 'Data'. When adding fields to a template, it is 'Template Fields'. This is because when creating a letter, the fields you insert become immediately populated with data for the patient whose record you have open, whereas with a template, the fields do not become populated until a new letter is created.
You have access to a greater variety of fields when using the Letter Writer from within a patient's record, than from the Clinical front screen. This is because many of the fields relate specifically to patient clinical or demographic data. As such, these fields are only available when a patient's record is open.
When adding fields to a template, you have access to an extra field called 'User Defined'. This field allows you to create customised field codes for use in your template. (See User-Defined Fields for further information).
Adding Fields to a Document
Fields are added to a letter or template via Letter Writer's Data Toolbar.
From within Letter Writer, either
Click

Press Ctrl + D
Select View > Data Toolbar
The
Data Toolbar
is revealed, appearing to the right of the Letter Writer window,
as shown in the following image.

To
expand or contract all data categories in the list, click the
Expand All  or Contract All
  buttons.
To
expand or contract an individual category, click the ![]() or
or ![]() buttons beside the
category.
buttons beside the
category.
Click within your document to place the insertion point where you would like the field to be inserted.
Select a field to add to your letter, by either;
Double-clicking the field, or
Selecting
the field and clicking 
The field is added to your letter, and;
In the case of a letter, the underlying field code activates and populates your page with data from your database. You can now edit this information if you desire.
In the case of a template, the field code appears on your page. Whilst you can now continue to add or modify other information on your page, you cannot edit this field code, as doing so will destroy the integrity of the field code, and it must be added to the page again.
Continue to add fields to your document, as you desire. Save or print your letter when ready.